I took this idea from one-yard wonders, which is a fabulous book, gifted to me by my M-I-L. Highly recommend it! I did a little tweaking and will give some tips on how to make it even better.
If you're looking for an easy, quick project, or maybe this is your very FIRST project, you've come to the right place. Easy Peasy
Are you ready to get started??
Here's what you will need:
1 yard of 44/45" fabric (any weight)
1 spool of coordinating thread
2 vintage or coordinating buttons (optional)..not optional in my mind because they add so much to the piece
Step 1: Measure, Mark and Cut
place your fabric in a single layer, wrong side facing up. Measure and mark the following pattern pieces, then cut them out:
Ruffle: 36" wide x 5" tall (cut 1)...if you have extra fabric, I would suggest making this wider/longer. It will create more ruffles..and who doesn't want that, right?!
Apron ties: 4" wide x 31" tall (cut 2)
Waistband: 22" wide x 4" tall (cut 1)
Apron: 22" on the top, 27" on the bottom, 20" from top to bottom (cut 1)..this may sound a little confusing. Just measure and mark the numbers I listed, then draw a diagonal line from the top measurements(22") to the bottoms (27") and cut.
Step 2: Hem the Apron
The directions said to make a 1/4" double-fold hem along the angled and bottom edge of the apron. I opted to use double-fold coordinating bias tape. I think it looks better and honestly, it's easier than trying to create a 1/4" hem!
Step 3: Make the Apron Ties
Press one short end of apron tie 1/2" toward the wrong side of fabric. Fold in half length-wise, NOT width-wise, with right sides together, aligning raw edges. Stitch along the unfolded end and the long side, leaving the pressed edge open. Clip the corners, turn right side out, and press. Top stitch close to the edges on all four sides. Repeat with other tie.
Step 4: Make the Ruffle
Again, the directions called for a 1/4" double-fold hem on one long and two short sides of the ruffle. I wish I had used the bias-tape again here. There are two ways to do this next step:
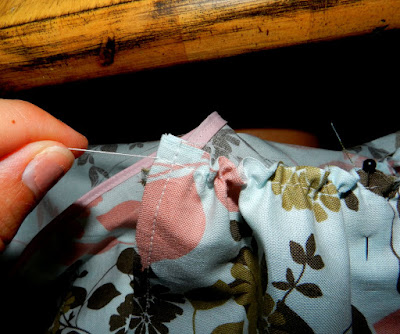
1...Use a basting stitch to gather the top raw edge of the ruffle piece. So, if you're unfamiliar with these terms, just set your machine to the longest stitch it has and sew a straight line. Then you will pull one piece of thread on one end to gather the fabric. like so....
Option 2...set your machine to a long stitch, and set the tension as high as it will go. Then just sew straight...the fabric should gather right before your eyes! It's seriously the best sewing tip I've found. BUT I've also heard that it doesn't work with all machines and, from experience, know that it doesn't work with all fabrics. The lighter the fabric weight, the better it works in my experience.
With right sides facing up, place the ruffle along the top, unfinished, edge of the apron, aligning the raw edges. Adjust ruffles so they are evenly distributed along the width of the top edge. Sew pieces together.
Step 5: Attach the Waistband
Press one long raw edge of the waistband under 1/2" to the wrong side of the fabric. With right sides together, align the raw edge of the waistband to the raw edge of the apron/ruffle, and stitch.
 |
| Here are all three layers together. |
Press seams toward the waistband.
The directions were very messed up in the next part so I improvised...just trying to figure out how to explain it to you...
Basically, you need to fold the waistband over, wrong sides together and fold the ends of the waistband towards each each other. Press. Then top stitch around all four sides of the waistband.
Things should look like this now...I'm sorry if that was confusing.
Step 6: Attach the Apron Ties
Pin one apron tie on the back side of the waistband, overlapping the edge 1 1/2" . Stitch in place. Repeat with other tie. For a little extra something, attach a vintage button on each side of the waistband where the tie attaches.
And you're done!! Please feel free to ask any questions or give any suggestions to make this better!
I love how mine turned out, but there's something about sewing for your little girl that is just so much more rewarding.....that's why I whipped up a matching one for her today! I'm also planning to make some matching hot mitts and hot pads and give the whole set to her on her birthday :)
Happy sewing!


No comments:
Post a Comment
I always love hearing your thoughts! Please leave a comment :)