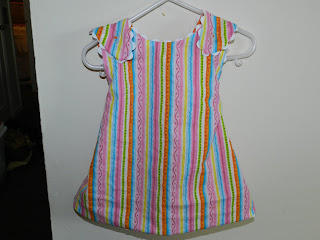
I have made two of these little dresses for my munchkin to play in this summer! They are soooo easy and lots of fun! This is my first tutorial, so bear with me as I try to direct you :) Please feel free to comment if you have any questions!
Here is what we will be making.....
 |
| the dress, not the ice cream ;) |
Sorry, not very many pics of her in the dresses! Not the fabric I will be showing you today, but same pattern. Her "aaaaaaaple" dress is her favorite thing to wear :)
Let's get started......
Here is what you will need:
1/2 Yd. fabric #1 of your choice
1/2 Yd. fabric #2 of your choice
2 packages of coordinating Rick Rack (roughly 3 yrds.)
2 coordinating buttons
sewing machine
basic sewing supplies
First thing, and probably the hardest is to cut your fabric pieces. Unfortunately, I don't have a way to create the pattern pieces for you. I created the original shape and have copied it since then. Measure your little one to decide the correct dimensions in length and width. Use chalk to create a shape you are confident in and cut one piece of each fabric.
*remember they will need to match exactly with RST (right sides together)
Next, take your rick rack and pin it along the inside of one piece of fabric (RST) like this:
Once you have lined the entire piece of fabric, sew to secure and remove pins.
 |
| we paused for a quick shot...she kept tapping my arm saying, "mama, mama, cheeeeeeese?" |
Here is what your dress should look like so far...
Next, pin your two fabric pieces together. RST
Turn your fabric so you can see the previous stitch line and sew on that same line.
*remember to leave a 4-5 inch opening to turn your dress right side out!!
Turn your dress right side out and sew your opening closed. (sorry, no pic for that step)
Now use your sewing machine to create button-holes on both....well, both spots that look like this! haha. This is the front of your dress.
Now add your buttons to the outer ends of the dress. like this....
Unfortunately, I didn't have some cuter buttons on-hand...
Now just cross the outer pieces around the back and button in the front! Voila!
 |
| back |
 |
| front |
 |
| opposite side front |
 |
| opposite side, back |
Completely reversible and super comfy for your little one :)
Fits my 21 month old...hits right at the knee. Sometimes she wears bloomers (or fancy pants as we like to call them) underneath, sometimes shorts, sometimes leggings, jeans....whatever the occasion, its super cute.
So have fun! and I'm sorry if the directions aren't clear! If you make one, please let me know how it turns out! :)
I think she likes it!?


These are soooooooo cute Ria, and I love the fabrics you chose! Clairsy's hair looks so straight in the pictures :)! Love that little munchkin :)! Looking forward to seeing you all this weekend.
ReplyDelete