Wednesday, May 22, 2013

Mexican Stuffed Peppers

Hello friends!! Just dropping in really quick to give you the recipe I promised!!!
Things are busy here as my sweet sisters wedding is drawing near! #excited. but I plan to get you updated on us very soon! 

In the meantime, let's cook....... 


Ingredients:

1lb. lean ground turkey
1 medium onion, diced
1 cup black beans, rinsed and drained
1 cup corn, drained
1 tbsp. taco seasoning
4 large bell peppers, rinsed, halved and seeded
1-2 cups shredded cheese, I used colby jack
2 tbsp. olive oil

Serves: 4-6...depending on how much you eat ;)


you can use whichever color pepper you prefer. 
I chose orange and yellow because I think they taste better than the green and red ones....
is that just in my head? 
does each color really have a different flavor? 
who knows. 


de-seed, un-seed...seed?? however you say that, just take those ol' seeds out along with the stem and some of that white membrane. 


Now put your scrumptious looking peppers in a baking dish and drizzle 1 tbsp of olive oil over them.
place in a 375 degree oven for 15-20 minutes.


meanwhile, put the remaining tbsp of olive oil in a large skillet and heat.
add onions and saute 3-4 minutes


add your ground turkey and cook until well done, stirring/breaking up the meat as it cooks


once the turkey is cooked all the way through, drain any excess fat


add the taco seasoning...
which, btw is super easy to make and so much better for you than the packets. 
#chilipowder #cumin #onionpowder #garlicsalt
.....can you hashtag in a blog?? 


now the beans and corn


get the stuff with less sodium..you won't miss it.
oh, and you won't need the whole cans! only 1 cup of each.


 and if you want to add a little extra cheese in the mix, I won't tell ;)


sometime during this process, your peppers will most-likely have been taken out of the oven.
 They should look a little wilted around the edges and will be full of water and oil, and juicy deliciousness. just dump the liquids into the pan they are sitting in.


now start stuffing


as you can see, they are overstuffed! 
that's how you want them. 
now top with as much cheese as you desire. 


once you've gotten over your little guilt trip about how much cheese you just used, 
place under the broiler for about 5 minutes, or until the cheese is bubbly.


enjoy with a dollop of daisy and some hot sauce :) I served mine with spanish rice and salad 


Hope you enjoy! 

oh and fyi, these peppers are super low carb and packed with protein! 

Wednesday, May 15, 2013

Trash to treasure: 2x4's


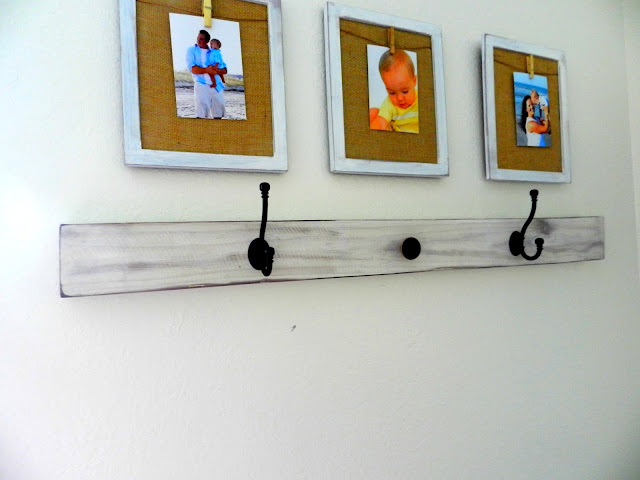
I have been finding so much fun in picking up, in essence, trash off the road, by the dumpster or really anywhere. By the way, people love to throw away good stuff and leave it by their trashcans/mailboxes here in FL....not sure why, but I've never seen as many pieces of furniture, toys, pianos (you name it, I've probably seen it) thrown to the curb like they do here. SO, in light of that, here's a recent trash find I redid into a little decor for the kids rooms. 

I found these 2x4's in the parking lot of our apartment....weird?! There were some pallets out there for a couple days and I'm assuming they came out of that pile at some point. They were super duper beat up. Like splinter valley. They were an odd yellow wood color. I honestly wasn't sure what I would do with them or if I'd even be able to transform them in any way. But I gave it a shot. I forgot to take a picture before I sanded them, but I was able smooth them out just enough to keep a distressed look without splintering my hands every time I touched it! And thankfully that awful yellow color was only on the surface. 


Next I decided to try whitewashing them. It took about 5 million coats, but I finally reached a color I was happy with. 


If you've never whitewashed anything, then well, you should. Just mix a little water into your paint (you kinda just have to play with the consistency, depending on the look you're going for), use an old t-shirt and dip that sucker right into the paint and wash your wood as if you were trying to clean it. Let dry in the sun (usually takes about 15 minutes) and repeat until your desired color is reached.

Next, I used a tip my awesome MIL (that's momma in law) told me about. I bought a dark brown ink pad and just went to town with it! Around the edges, on the corners, I even used my fingers to highlight some of the grain showing through the whitewashing. Here's what I was working with now!


I went on the hunt for some antique looking hardware to throw on here, but got a little impatient and decided to just go to Lowes instead. Grabbed a couple knobs and a couple hooks and attached them.


This one is in the boy's room. The other one is going in Clairsy's room, but the screws that came with the knobs for hers weren't quite long enough, so I have to get some of those to finish attaching hers. Pretty much looks the same....only its two knobs and one hook, and they are a brushed nickel.


I love the way it turned out! From trash in the parking lot, to a statement on the wall :) Now what to hang on these hooks? I was thinking maybe some of his favorite things? Or maybe I'll hold onto the baby in him a little longer and dig out his little hospital booties, and first baseball cap? Suggestions?? 

I hope you are inspired to look for junk! ha! No really though, be on the lookout for things like this! Try to look past the paint job, rough surface, or missing hardware. Whether it be furniture, scrap wood, old dishes, planters, most things can be redone with a minimal amount of talent or money. 

Thanks for reading! Look for more posts labeled "Trash to Treasure" here in the near future. I found some great things the other day that I can't wait to transform! 

Happy humpday, y'all! 

Tuesday, May 7, 2013

saved by a schedule

*these pics are completely unrelated to the post, fyi. just some recent shots of the little munchkins :) 


Do any of you keep lists? Schedules? Like actual schedules, written down, every day? Well, I do. I don't always stick to those schedules, nor do I always write them. But I have found, the more lists I make, the more detailed my schedule is, the more productive I am and the better mood I'm in.


Type A personality? I think I am becoming that way. I never thought of myself as rigid, or inflexible, but the older I get, the more I desire that order, plan, list, schedule of events, daily/weekly/monthly goals. I love it and hate it at the same time.


 I certainly don't want to become one of those women who can't be flexible. Those women who can't do spur of the moment. Those women who have to leave the mall at exactly 12:22 to make sure they get home in time for little junior's nap. Those who's inflexibility cause them to miss out on friendships, serving others, or just having some good ol' fashioned fun! NO! I will not become that way.


But I am finding myself unmotivated. Tired. Scatter brained. And the "things to accomplish today" lists, and the consistent daily schedules are really my salvation these days.


 Knowing that I have food in the fridge for breakfast in the morning, snacks during the day, and dinner that night is so comforting! But that only happens because I write out weekly meal plans at the beginning of the week, followed by a detailed grocery list. I love having a scheduled time for me to do things like blog, sew, paint, create, garden. It gives me something to look forward to.


My time with the Lord has also become so much more consistent! Some of you may critique me on "penciling in my quiet time" but when I sit down with a cup of coffee, my bible, guitar and journal, it doesn't feel penciled in. Its relaxing, and I look forward to 1:30 every day.


  ClaireBell also loves plans :) She'll often ask me, "ok, what's the plan today, Mama?" She loves to know what's coming, and enjoys her alone time to play, read or draw while Ryder is sleeping.


So schedules....they save me every day. They keep my house clean. They keep me focused on what's important. They keep me off my phone! whoo...that's a big one! Isn't it so easy to spend too much time on these iPhone's?? So fun. But can be sooooo time consuming. They keep me active...i.e. playground days, beach days, pool days, gym time. They keep me from spending too much money at the grocery store. They keep me and my family eating healthier. I could go on...


So tell me, are you a list maker? a schedule keeper? or maybe you just fly by the seat of your pants and still manage to get more done than I do :)


All that said, blogging is on my "list." I have been trying to get ahead a little by editing pictures and planning posts to hopefully be a little more consistent on here. I really enjoy it so much! Here are some posts to look for soon:


Can you believe I found this piece of wood in a parking lot?? Can't wait to show you how easy it was to turn into what you see here!


Can I just say, um. delicious. You have to try this recipe! 


I will share a technique with you that will blow your mind and make even the most artistically challenged person more than able to make a painted canvas! 


Looking forward to sharing these posts and more very soon!! Thanks for reading :)

Tuesday, March 5, 2013

Diy- Camera Strap Cover

I am excited to share this DIY with you all! I've been wanting to make a camera strap cover for quite some time now and when my sis' mentioned wanting/needing one, I knew her birthday was the perfect opportunity!  So here's what I came up with!

*Note! If you are a beginner sewer, or just have a hard time following online tutorials, this is the perfect project for you! Seriously the easiest sewing project I have done. So give it a try!


Here's what you will need:


1 piece of light to medium weight fabric cut to 6" x 30" 

1 piece of jersey fabric cut to 1.75" x 60"

1 piece of jersey fabric cut to 2.5" x 60"

1 piece of coordinating fabric cut to 6" x 3.5"

Coordinating thread

If you are wondering if this will fit your camera strap, I'm almost positive it will. As long as its a basic strap (not one of the fancy padded ones) it fits both Canon and Nikon.


STEP 1:

On the top of your strap material, measure in 1.75" from one side and draw a line down the length of the fabric.  This will be the sew line for your ruffle.


STEP 2:

Now it's time to make your ruffle.  

There are two methods for ruffling. I'll give you both options. 

Option 1. Stack your two ruffle lengths on top of each other, smaller one on top.  Use matching thread for the top thread and white thread in your bobbin.  Set your stitch length to 5 (or higher) so that they are long.  Sew a seam down the middle of your two fabrics. Do not back stitch.  After you have your seam, hold the white thread and pull to create your ruffle. Space your ruffles out evenly, making it the same length as your strap fabric.

Option 2. Stack your two ruffle lengths on top of each other, smaller one on top. Use matching thread for the top thread and white thread in your bobbin. Set your stitch length to 5 ( or higher) AND set your tension as high as it will go. Sew a seam down the middle of your two fabrics. Do not back stitch. If all goes well, your fabric should already be ruffled! Some minor adjustments may need to be made to get to your desired length. 

Whichever option you chose, this is what you should have now:

Option 2 in action!


*In order to make it easier to add your pocket, leave 3" at one end of your ruffle material smooth. As shown above.  If you aren't creating a pocket, you can make the whole piece ruffled evenly.*

STEP 3:

Match up the ruffle seam and the line you drew. 


Sew in place.


STEP 4: 

Now it's time to create your pocket.  Your pocket piece should measure 6" x 3.5" with the top being the long edge.  Fold over the top edge 1/2" and press.  Sew in place. 


STEP 5:

Place your pocket piece over one end of your strap.  This will be the end that you left the ruffle material smooth.  Pin in place. Next stitch a seam up the center, back stitching at the top of your pocket piece for extra strength.


STEP 6:

Now you will want to hem both ends of your strap material.  Fold over the ends 1/2" towards the back and press.  Stitch in place.

sorry, didn't get a pic of the other side.

STEP 7:

Now fold your strap material in half longways and pin together.  Sew a seam up the side with a 1/2" seam allowance.  I pushed the ruffle material out of the way as I stitched so that it would not get caught in my seam.

*this pic might be confusing!!! I was just trying to show the correct fold, but it looks like I'm about to sew down the left side! Sew the OPEN side shown on the RIGHT here :) sorry about that!*


Here is what you should be looking at:


*Looking back, I realize I should have used a serger or at least a zig-zag stitch on the edges to prevent fraying.*

STEP 7:

Now turn your strap right side out.  We are almost done!! 


Don't worry if your strap looks all frumpy and lumpy, it just needs a good iron!! Don't iron the ruffle, just push it out of the way and iron both long sides flat.

BEFORE

AFTER
And you're done!!! 


Not only does your camera have a new personality, but it also has a  sweet pocket to keep you from losing your lens-cap while snapping away!


I hope this tutorial was easy for you to follow! Please, please let me know if you have any questions!